Showing posts with label Pretty Pink Posh. Show all posts

Saturday, September 27, 2025

Pretty Pink Posh Christmas Cake Pops Card

Hello everyone! I'm sharing a festive holiday card featuring the Christmas Cake Pops. from Pretty Pink Posh. I loved the Halloween Cake Pop dies released last month and was so happy to have this new set to continue the cake pop paper crafting fun well into the holiday season. 


The background for my cake pop scene is an A2 size panel of light blue card stock with lots of white and silver paint splatter. I used dies from the Christmas Cake Pops set to create the tree, snowman, and reindeer cake pops complete with all the details for each character including the bows. 


I wanted the cake pops to be sticking out from a little pine greenery. I used dies from the Holiday Wreath Builder set to cut out the pine sprigs from hunter green card stock. I sprayed them with Fresh Balsam Mica Stain to add the shimmer effect. 


To finish the card I added a greeting and some extra pine to space above the reindeer. The Joyful Holiday Wishes sentiment comes from the new Christmas Banner Greetings stamp set. I die cut the banner shape with Banner Greetings 1 dies. 


Sunday, August 17, 2025

Pretty Pink Posh Fringe Pumpkin Tags

Hello there! I'm sharing an easy way to make some pumpkin shaped Halloween tags. I have used the new Fringe Pumpkin dies from Pretty Pink Posh to create these fun tags. I will also show how you can make them into a mini card. 


I die cut my pumpkin tags from two shades of orange card stock. I shaded the edges with a dark orange ink and then added lots of paint splatter to each layer. Once all the layers of the Fringe Pumpkin are adhered, you can add any embellishments or greetings you'd like. 

I added some cute halloween images to the front of one of the tags. These images are from the Spider Friends and Halloween Word Scenes stamp sets. On the other tag I used the Happy Halloween Shadow dies. 


To turn these tags into a mini card, all you need to do is die cut a back piece using the largest die in the Fringe Pumpkin set. Score this large piece towards the top of the pumpkin and adhere to the back of the tag by putting adhesive only above the score line. This creates a hinge point and the tag will open just like a card. You can stamp a sentiment inside or add you own personal message. 


These pumpkin tags can be customized or decorated however you'd like. They are a perfect size to add to a treat bag or candy bucket for friends and family.


Wednesday, August 13, 2025

Pretty Pink Posh - Spider Shaker Card

Hello everyone! I have a super fun Halloween shaker card today. I absolutely love the new Spider Shaker die from Pretty Pink Posh. He's just too cute to spook and makes such an impactful element on an A2 size card. To fill the shaker I used some Spellbound Shaker Beads. The whimsical color combo of this bead mix seemed just right for my spider themed card. 

The background on this card is a blend of Dusty Concord and Villainous Potion Distress Oxide inks with lots of splattering. 

Besides the Spider Shaker, I used some other Pretty Pink Posh die sets to complete this card. For the hat, I used dies from an older set - Halloween Mug Additions. It's the perfect size for the spider! 

J

The little web and spider dies are included in the Halloween Holder Additions. They made some fun embellishments to fill the spaces around the large spider. 

The Halloween Greetings stamp set includes a variety of spook-tacular sentiments. I picked out a couple to add to my card. I white heat embossed them on black card stock so they would really stand out. 


I'll leave you with a few my creative tips to make any Halloween card even more fa-boo-lous! Add google eyes to Halloween critters. I keep a stash of different shapes and sizes on hand for this purpose. Cut a thin strip of card stock to use as a web string for the spider to hang from. Lastly use an action wobbler to attach the spider (or any creepy, crawler critter) onto the card. The wobbler action is perfect for a shaker element and make the card tons more fun for the recipient! 


Thursday, March 27, 2025

Pretty Pink Posh Easter Card

Hello Everyone! Today I'm sharing a mini slimline sized card featuring an adorable bunny with some large decorated eggs all created with new products from the Pretty Pink Posh March release. 


I started this card by adding a blue sky and three layers of the Grass Border onto a panel that's just slightly smaller than the mini slimline card base. I then created two large eggs with the Build An Egg dies. I choose to keep the decoration on the eggs simple but there's many dies included in this set that gives the option for making them much more detailed if you'd like.


Next I die cut and assembled my bunny using the Bunny Holder die set. You can easily customize this cute bunny and add fun accessories with the Easter Holder Additions die set. I decided to keep this bunny simple as well by die cutting the body from white card stock and adding light pink ink blending around the edges. I gave him some rosy cheeks with R00 & R20 Copics.


To complete the card, I tucked the eggs and bunny into the grass border layers and adding the Easter Greeting. This stamp is included in the new Easter Greetings set which has coordinating dies. 

I hope this bright and colorful Easter card gets you into the spring crafting spirit. Thanks for stopping by and have a wonderful day!


Wednesday, March 19, 2025

Pretty Pink Posh Spring & Easter Release

The newest release from Pretty Pink Posh is available and shipping now! To see everything included in this fun spring and easter themed release click here!

I have one card to share today showcasing the super cute new Bunny Holder and Easter Holder Additions dies. 


I have also used the Grass Border die and Easter Greetings stamp set to complete this card.  I have die cut the bunny, all the decorative additions, and the grass border from white card stock then used small blending brushes and Catherine Pooler inks to color each piece. Colors used are listed below this photo.


CP ink colors: Party Dress for little flowers, Lime Rickey for carrot tops & leaves, Garden Party for grass, Orange Peel for carrots, Tranquil for bow tie and butterfly, Tiara for basket and butterfly, Wintergreen for background, Cotton Candy for shading on bunny. 

I will be participating in an Instagram Hop on March 24th when I will be sharing another card made with products from this release. There will be a giveaway for a Pretty Pink Posh gift certificate so you don't want to miss it.  See you then!

Wednesday, January 8, 2025

Pretty Pink Posh January Product Release Blog Hop


Hello and welcome! It's day three of the Pretty Pink Posh January Release Blog Hop. (click here to see the new release) This release is all about Valentine's and the season of love. If I'm being honest, Valentine cards are my absolute favorite type of card to make. I just adore a traditional red and pink color palette for Valentine's Day. You will see that plenty in the cards I'm sharing today. But first a little giveaway business... be sure to leave a comment to be entered in the giveaway for a $30 gift certificate. Four winners will be randomly chosen (one each day) from comments along the hop. Giveaway closes on January 15th at 11:59 pm PST and winners will be announced on the Pretty Pink Posh Blog.

Day 3 Blog Hop Lineup:

Leanne West <--you are here


Now on to what you're here for, the project inspiration! I have made a coordinating card duo to share that feature the new Fox Holder & Valentine Additions Holder die sets in action. 


You can create the sweetest foxes with new Fox Holder die set. The fox is such a fun size at 4 inches tall and is the perfect focal point for an A2 size card. I die cut the female fox body from kraft card stock and then lightly shaded the edges with some Spiced Catherine Pooler ink. The male fox is die cut from a rusty brown card stock. I also shaded the edges with the CP Spiced ink to add a bit of depth and dimension. For the white areas, I used warm grey Copics to add shading. I used R00 & R21 to add the rosy cheeks. 


Here's a break down of all the Pretty Pink Posh products I used to create these cards. Each item is linked to the individual product page in the PPP shop. 


There will be lots more project inspiration after the blog hop days. Starting on January 13th, there will be a four day Instagram Hop with more chances to win a $30 gift card to the Pretty Pink Posh shop.  I'll be joining in for Day 1 of that hop and sharing another fun Valentine's card. See you then! 


Monday, January 6, 2025

Pretty Pink Posh Valentine's Release

Hello there! Just a short post today to let you all know that there's a new Pretty Pink Posh release available and it's loaded with fun products for making Valentine's and Love theme projects. 

-->click here to shop the new release<--

I'm sharing a simple Valentine's card featuring the new Fringe Heart die set. 


This is an A2 size card and as you can see, the large fringe heart fills the space nicely. You really don't need to add much else making this design quick and easy. 

All Pretty Pink Posh products used to create this card are listed and linked below:

Be sure to check back here on Wednesday (1/8) when I will be participating in a blog hop to showcase this fabulous new release. There will be a giveaway! See you then!


Monday, October 21, 2024

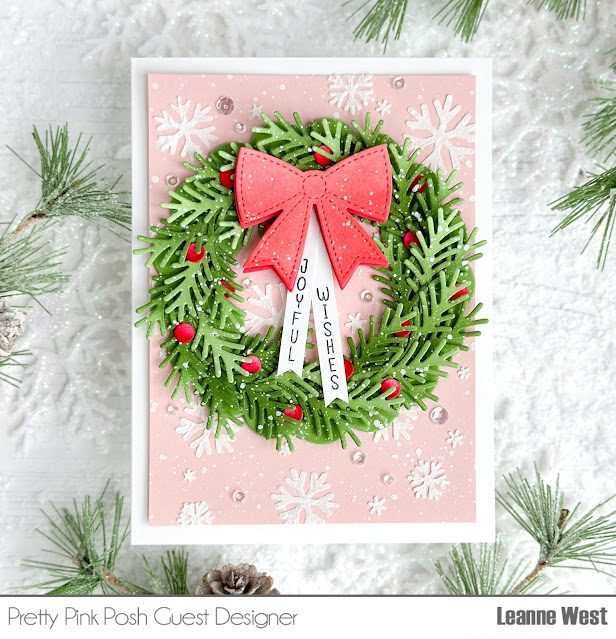
Pretty Pink Posh Holiday Wreath Builder Card


Hello friends! I'm sharing a card created with some new products from Pretty Pink Posh. I have always loved to create little paper wreaths to add to cards so I was excited to see the Holiday Wreath Builder die set from Pretty Pink Posh. This set has all the basic components to make a wreath. The possibilities are endless! For the card I'm sharing today, I made a very full pine wreath. 


I kept this card design on the simple side because the wreath really is the star here. I started with a white A6 card base. I created the background panel with the Cascading Snowflakes Stencil. I used a white opaque paste with the stencil. I moved the stencil around applying the paste only in select areas to get the random snowflake pattern. I then splattered the panel with thinned white paint. 


To create the wreath, I used all three sizes of pine sprigs included in the Holiday Wreath Builder set. I adhered them onto the large wreath base. I added in the little red berries and a double layer bow. I then gave the wreath a good splattering of white paint to give it the snowy look. 


To complete the wreath, I added sentiment strip ribbons coming down from the bow. I used the Upright Greetings Christmas set to stamp the Joyful Wishes. I then adhered the wreath to the background with thin foam tape. To finish off the design, I added several Sparkling Clear Sequins scattered all around the background. 


Wednesday, October 16, 2024

Pretty Pink Posh Holiday Release Blog Hop


The October Release from Pretty Pink Posh is now available for purchase and we are celebrating with a 3 day blog hop! Be sure to leave a comment to be entered in the giveaway for a $50 gift certificate. Three winners will be randomly chosen (one each day) from comments along the hop. Giveaway closes on October 22nd at 11:59 pm PST and winners will be announced on the Pretty Pink Posh Blog.

Day 1 blog hop lineup:


There's so many fun holiday sets in this release but the Build An Ornament die set immediately caught my eye. I knew I had to make a card featuring these festive ornaments. 


Below is a list linking all of the Pretty Pink Posh supplies you'll need to recreate this card:
Other supplies needed: opaque white paste to stencil snowflakes (I used Aleene's True Snow), white paint for splattering, glitter card stock, silver metallic card stock, Distress Mica Stains for coloring parts of the ornament, and baker's twine. 


This card design is an easy one to make so I won't go into too much detail about the process but I will share some of my creative notes and tips if you'd like to make a card like this. 

For the stenciled snowflakes, if you don't have a paste, a white pigment ink will work.  I just like to use the paste because it gives fabulous texture to the background and results in a nice opaque white snowflake on the solid color card stock. 

99% of the time on holiday cards, I'll generously add white spatters to the background & any winter foliage. I think it helps reinforce that wintery or snowy vibe. 


When making Christmas cards, I feel like this gives me the opportunity to add lots of sparkle and shimmer... especially with ornaments! So I didn't hesitate to use a white/silvery glitter card stock for these ornaments. For the colorful parts, I used Distress Mica Stains to add lots of shimmer. I die cut these pieces from white card stock and then sprayed with the following Mica 
Stains: Frosty Mint, Sugary Gumdrop, & Wicked Elixir. The photo does not do it justice but in person, the glitter and Mica Stain adds so much sparkle and shine to this card. 

Thanks so much for joining us today! Don't forget to leave a comment to be entered in the giveaway for a $50 gift card to shop at Pretty Pink Posh. 

Tuesday, September 10, 2024

Pretty Pink Posh September Release Blog Hop


The September Release from Pretty Pink Posh is now available for purchase and we are celebrating with a 3 day blog hop! Be sure to leave a comment to be entered in the giveaway for a $30 gift certificate. Three winners will be randomly chosen (one each day) from comments along the hop. Giveaway closes on September 16th at 11:59 pm PST and winners will be announced on the Pretty Pink Posh Blog.

Blog Hop Line up:

I'm sharing a card created with a mix of things from the new release but the star of the show is definitely the cute Stitched Turkey.  This turkey is so fun and easy to put together. I die cut the pieces for mine from white card stock and then blended on ink to color.  Everything I used to create this card is listed below the photo. 


Pretty Pink Posh supply list for Stitched Turkey card:
I added 6mm google eyes to the turkey. I used Catherine Pooler inks for the stenciling and coloring the die cuts in the following colors: Catching Rays (yellow), Cotton Candy + Bellini (peachy pink), Tutti Fruity (deep orange), Ginger (rust), Over Coffee (brown), Green Tea (green). 


If you have any questions, just drop them in the comments. I get notified when comments are left so I can answer questions ASAP. Thanks so much for stopping by! Your next stop on the hop is my talented crafty friend Debbie Frank. 


Thursday, March 7, 2024

Pretty Pink Posh March Release Blog Hop


Hello crafty friends! I'm excited to be joining Pretty Pink Posh this month to help showcase the March Product Release. My post today is part of a 3 day blog hop. There are 3 $30 gift certificates up for grabs (one winner each day). Winners will be picked randomly from all comments which must be left by 11:59 PM PST on 3/13/2024. Winners will be announced on the PPP blog.

--->click here to see the entire March Release<---

Blog Hop Day 2:


I have three cards to share today. They all have a Spring/Easter cupcake theme.  For this first card, I've created a slimline scene using only the Big Easter Cupcake die set. I absolutely love this set! There's so many fun possibilities for creating Easter and Spring themed cupcakes plus all the decorations to go with.  


I die cut all the pieces for my scene from colored card stock 
except for the white bunny parts. (All card stock colors I used will be listed at the end of this post) I lightly shaded each piece before assembling.  I added rosy cheeks to the chick and bunny.  I also added highlight lines with a white gel pen. For the background I created a rainbow blend of colors that coordinated with my card stock colors.  

For my next card I again used the Big Easter Cupcake set. I had a little fun with the dies to create the backside of a bunny for the cupcake. I wanted him to appear like he's digging for carrots.  


Other March Release products used to create this card are: Eyelet Circle die, Easter Words Stencil, Easter Sentiment Strips stamp set.  

This last card features some super cute images from the Easter Cupcake stamp set. I've created a simple mini slimline card with four of the cupcake images and a row of Easter Eggs.  


I have Copic colored the cupcake images with the following colors: BG11, BG13, Y11, Y15, YR12, YR18, YG11, YG18, R00, R20, RV10, RV04

Below is a list of card stock colors I used for all cards:


Thursday, February 8, 2024

Pretty Pink Posh Big Birthday Cupcake Cards

Hi there! I have some fun birthday cards to share showcasing the new Big Birthday Cupcake dies from Pretty Pink Posh.  If you loved the Big Valentine Cupcake set then you'll definitely be interested in this new cupcake set.  

These cards are 4bar size. The 4bar size is 3 1/2 inches by 4 7/8". It's such a cute size and makes the perfect little note card to enclose with a gift.  The cupcakes fit nicely on this size too!


I was inspired by the color palette of the Berry Smoothie Shaker Beads.  It's such a pretty mix of pinks and blues.  I pulled card stock from my stash matching those colors to create my cupcakes using the Big Birthday Cupcake dies.  


Once I had the cupcakes assembled, I adhered them to a decorative panel created with the second largest Eyelet Rectangle die.  The Sentiment Strip Birthday stamp set had the perfect greetings to add to my cards.  I stamped them right onto the cupcake frosting part.  


It's a little hard to see in the photos, but I applied some Glossy Accents and Stickles Glitter to the sprinkles on each cupcake.  This added a bit of sparkle and shine.  That's it and these cards are ready for gifting! They were so quick and easy to make.  I'm sure they would be fabulous in many other color combinations. 
Thanks for stopping by today! 


Pixi Dust Designs Holiday Release

  Hi everyone! Are you ready to get inspired to start your Christmas crafting? I'm sharing some very fun projects all made with the fabu...