I'm excited to be joining Tracy McNeely again this year for her annual 25 Days of Christmas Tags event. This year marks her 9th anniversary of hosting the event. Be sure to visit the daily posts on Tracey's blog for more tag inspiration and a chance to win today's giveaway.
Today's featured stamp company is Honey Bee Stamps and
there's an awesome Black Friday sale happening now!
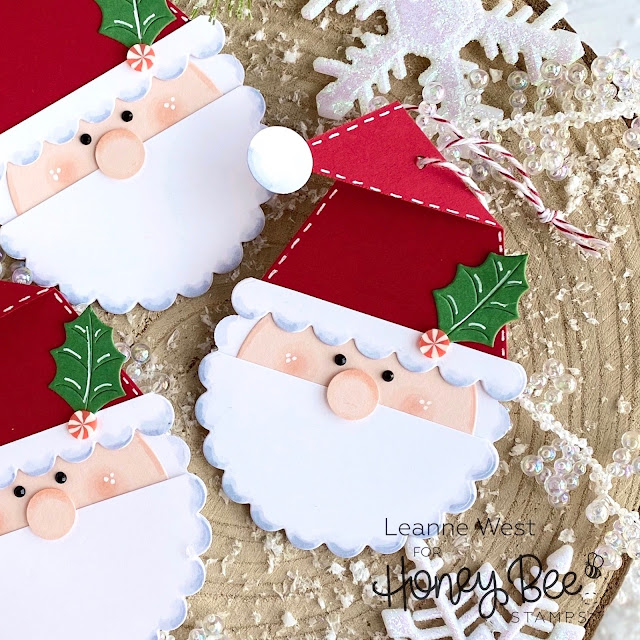
I'm sharing some custom Santa tags that I've created using Honey Bee Stamps products. I had seen similar paper pieced Santa tags on Pinterest and wanted to try making my own with dies in my stash.
Listed and linked below are all the Honey Bee products I've used:
- Stacking Pennants Honey Cuts - hat
- Scallop Square Gift Tag Honey Cuts - hat trim
- Scallop Circle Gift Tag Honey Cuts - face, beard, and backing
- Winter Bouquets Honey Cuts - holly leaf
- Black Gem Stickers - eyes
- Peppermint Swirl Clay Bits
- Santa Express Stamp Set
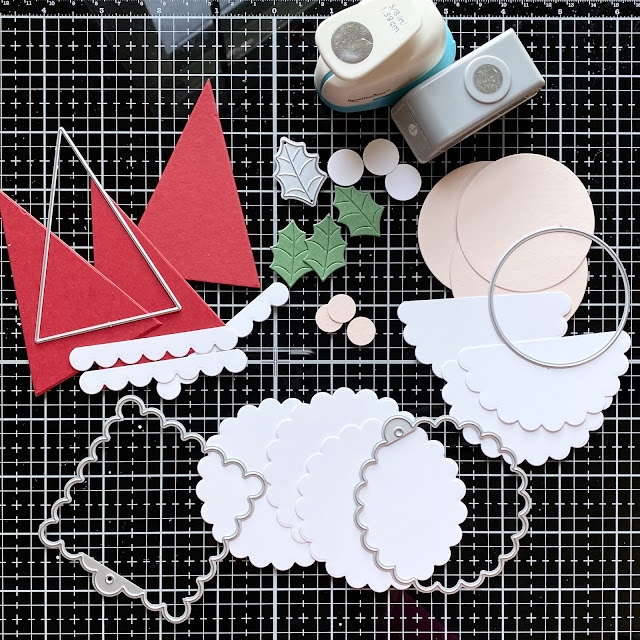
As you can see from the photo above, I started by die cutting all the elements to build the tags. I did some partial die cutting to make the Scallop Circle Gift Tag just a plain scalloped circle. You could just leave it as is to tie the twine onto instead of punching an extra hole in the hat. For the beard, I cut the scalloped circle in half. I trimmed off an edge of the square scalloped tag to use as the hat trim.
I used a scoring board to make the angled fold in the hat. I used Copic makers for shading on the beard and white hat trim and to add rosy cheeks to the face. The Black Gem Stickers were a quick and easy way to add eyes.
I added stitching detail to the hat with a white gel pen. Before assembling, I stamped a greeting on the back. There's several from the Santa Express set that perfectly fit within the scalloped circle backing.
For the nose and hat pom pom, I used circle punches from my stash - 1/2" for the nose and 5/8" for the hat.


How sweet are these cute Santa Tags!!! wow and a picture of the parts and information on how you did it, fantastic. They would look so cute hanging on a tree. Love your tags.
ReplyDeleteJust darling!!
ReplyDeleteADORABLE! I love all the different dies you used to make him!!!!!!!!!!!!
ReplyDeletewow, so sweet :)
ReplyDeleteLove these, such a creative design!
ReplyDeleteAdorable tags! Such a fun and festive design - so beautifully executed.
ReplyDeleteThese are so clever! I am in love with your cute Santa tags!
ReplyDeleteGreat paper piecing. These are very cute.
ReplyDeleteAdorable tags! I love the stitched detail and the other highlights!
ReplyDeleteI love your Santa! So cute! You are very talented and creative!
ReplyDeleteThese are adorable--thank you for showing me how to make them.
ReplyDeleteThese Santa tags are fabulous! Truly creative!!!! I had to use them for my inspiration (@Bevscreativepath on Instagram). ;)
ReplyDeleteWhat a wonderful tag and the sentiment is perfect. Thanks for sharing.
ReplyDeleteOh my!!! Fabulous tags!!!
ReplyDeleteGreat job on putting odds and ends
ReplyDeletetogether to make a darling Santa face.
thanks for sharing
txmlhl(at)yahoo(dot)com
Fabulous Santa tags - thanks for the instructions. I will absolutely have to make some of these!
ReplyDeleteI absolutely ADORE your sweet Santa tags. My favorite today. I will definitely be using this fabulous idea. Thanks for sharing your talents.
ReplyDeleteBlessings,
Karen Letchworth
I love these tags. They are genius. Adorable. [Bunny]
ReplyDeleteThese are so cute! Thanks for showing how you built them.
ReplyDeleteMarisela Delgado said: Super cute Santa. mariandmonsterd@yahoo.com
ReplyDeleteThanks for the inspiration ... I had fun making my own version of Santa.
ReplyDeleteThey are so clever! You did an amazing job and I enjoyed CASEing your tags. :) Hugs, Autumn
ReplyDeletehttps://sewpaperpaint.blogspot.com/2019/12/how-to-host-holiday-craft-party.html
love these tags!
ReplyDeleteI really love your Santa's. Thanks for sharing your creative ideas.
ReplyDelete